Збереження стану програми
В одній із попередніх тем був розглянутий життєвий цикл Activity у застосунку на Android, де після створення Activity викликався метод onRestoreInstanceState, який відновлював її стан, а перед завершенням роботи викликався метод onSaveInstanceState, який зберігав стан Activity. Обидва ці методи як параметр приймають об'єкт Bundle, який зберігає стан Activity:
protected void onRestoreInstanceState(Bundle saveInstanceState);
protected void onSaveInstanceState(Bundle saveInstanceState);
У яких ситуаціях доречно використовувати ці методи?
Банальна ситуація — переворот екрана та перехід від портретної орієнтації до альбомної та навпаки. Якщо, наприклад, графічний інтерфейс містить текстове поле для виводу TextView, і ми програмно змінюємо його текст, то після зміни орієнтації екрана його текст може зникнути.
Крім того, якщо ми використовуємо глобальні змінні, то при зміні орієнтації екрана їхні значення можуть бути скинуті до значень за замовчуванням.
Щоб точніше зрозуміти проблему, з якою ми можемо зіткнутися, розглянемо приклад. Змінимо файл activity_main таким чином:
<?xml version="1.0" encoding="utf-8"?>
<androidx.constraintlayout.widget.ConstraintLayout
    xmlns:android="http://schemas.android.com/apk/res/android"
    xmlns:app="http://schemas.android.com/apk/res-auto"
    android:layout_width="match_parent"
    android:layout_height="match_parent" >

    <EditText
        android:id="@+id/nameBox"
        android:layout_width="0dp"
        android:layout_height="wrap_content"
        android:hint="Впишіть ім'я"
        app:layout_constraintBottom_toTopOf="@id/saveButton"
        app:layout_constraintLeft_toLeftOf="parent"
        app:layout_constraintRight_toRightOf="parent"
        app:layout_constraintTop_toTopOf="parent" />
    <Button
        android:id="@+id/saveButton"
        android:layout_width="wrap_content"
        android:layout_height="wrap_content"
        android:text="Зберегти"
        android:onClick="saveName"
        app:layout_constraintBottom_toTopOf="@id/nameView"
        app:layout_constraintLeft_toLeftOf="parent"
        app:layout_constraintTop_toBottomOf="@id/nameBox"/>

    <TextView
        android:id="@+id/nameView"
        android:layout_width="wrap_content"
        android:layout_height="wrap_content"
        android:textSize="18sp"
        app:layout_constraintBottom_toTopOf="@id/getButton"
        app:layout_constraintLeft_toLeftOf="parent"
        app:layout_constraintTop_toBottomOf="@id/saveButton"/>
    <Button
        android:id="@+id/getButton"
        android:layout_width="wrap_content"
        android:layout_height="wrap_content"
        android:text="Отримати ім'я"
        android:onClick="getName"
        app:layout_constraintLeft_toLeftOf="parent"
        app:layout_constraintTop_toBottomOf="@id/nameView"/>

</androidx.constraintlayout.widget.ConstraintLayout>
Тут визначено поле EditText, у яке вводимо ім'я. І також визначено кнопку для його збереження.
Далі для виведення збереженого імені призначене поле TextView, а для отримання збереженого імені - друга кнопка.
Тепер змінимо клас MainActivity:
package com.example.settingsapp;

import androidx.appcompat.app.AppCompatActivity;

import android.os.Bundle;
import android.view.View;
import android.widget.EditText;
import android.widget.TextView;

public class MainActivity extends AppCompatActivity {

    String name ="undefined";

    @Override
    protected void onCreate(Bundle savedInstanceState) {
        super.onCreate(savedInstanceState);
        setContentView(R.layout.activity_main);
    }

    public void saveName(View view) {

        // отримуємо введене ім'я
        EditText nameBox = findViewById(R.id.nameBox);
        name = nameBox.getText().toString();
    }
    public void getName(View view) {

        // отримуємо збережене ім'я
        TextView nameView = findViewById(R.id.nameView);
        nameView.setText(name);
    }
}
Для зберігання імені в програмі визначено змінну name. Під час натискання на першу кнопку зберігаємо текст з EditText у змінну name, а під час натискання на другу кнопку - назад отримуємо текст зі змінної name у поле TextView.
Запустимо додаток, введемо якесь ім'я, збережемо і отримаємо його в TextView:
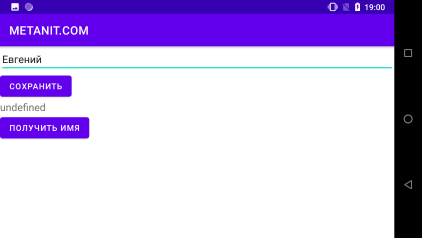
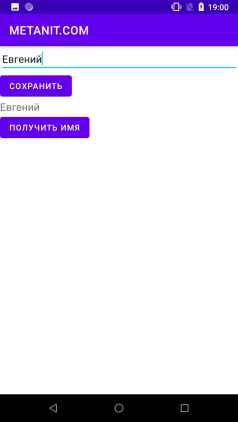 Але якщо ми перейдемо до альбомного режиму, то TextView виявиться порожнім, незважаючи на те, що в нього начебто вже отримали потрібне значення:
 І навіть якщо ми спробуємо заново отримати значення зі змінної name, то ми побачимо, що вона обнулилася:
 Щоб уникнути подібних ситуацій якраз і слід зберігати та відновлювати стан activity. Для цього змінимо код
 MainActivity:
package com.example.settingsapp;

import androidx.appcompat.app.AppCompatActivity;

import android.os.Bundle;
import android.view.View;
import android.widget.EditText;
import android.widget.TextView;

public class MainActivity extends AppCompatActivity {

    String name ="undefined";
    final static String nameVariableKey = "NAME_VARIABLE";
    TextView nameView;
    @Override
    protected void onCreate(Bundle savedInstanceState) {
        super.onCreate(savedInstanceState);
        setContentView(R.layout.activity_main);

        nameView = findViewById(R.id.nameView);
    }

    // збереження стану
    @Override
    protected void onSaveInstanceState(Bundle outState) {

        outState.putString(nameVariableKey, name);
        super.onSaveInstanceState(outState);
    }
    // отримання раніше збереженого стану
    @Override
    protected void onRestoreInstanceState(Bundle savedInstanceState) {
        super.onRestoreInstanceState(savedInstanceState);

        name = savedInstanceState.getString(nameVariableKey);
        nameView.setText(name);
    }
    public void saveName(View view) {

        // отримуємо введене ім'я
        EditText nameBox = findViewById(R.id.nameBox);
        //  зберігаємо його у змінну name
        name = nameBox.getText().toString();
    }
    public void getName(View view) {

        //  виводимо збережене ім'я
        nameView.setText(name);
    }
}
У методі onSaveInstanceState() зберігаємо стан. Для цього викликаємо у параметра Bundle метод putString(key, value), перший параметр якого — це ключ, а другий — значення збережених даних. У цьому випадку ми зберігаємо рядок, тому викликаємо метод putString(). Для збереження об'єктів інших типів даних ми можемо викликати відповідні методи:
put(): універсальний метод, який додає значення типуObject. Відповідно, поле отримання це значення потрібно перетворити до потрібного типу.putString(): додає об'єкт типуString.putInt(): додає значення типуint.putByte(): додає значення типуbyte.putChar(): додає значення типуchar.putShort(): додає значення типуshort.putLong(): додає значення типуlong.putFloat(): додає значення типуfloat.putDouble(): додає значення типуdouble.putBoolean(): додає значення типуboolean.putCharArray(): додає масив об'єктів типуchar.putIntArray(): додає масив об'єктів типуint.putFloatArray(): додає масив об'єктів типуfloat.putSerializable(): додає об'єкт інтерфейсуSerializable.putParcelable(): додає об'єкт типуParcelable.
Кожен такий метод також в якості першого параметра приймає ключ, а в якості другого — значення.
У методі onRestoreInstanceState() відбувається зворотний процес — за допомогою методу getString(key) за ключем отримуємо збережену строку. Відповідно, для отримання даних інших типів ми можемо використовувати аналогічні методи:
get(): універсальний метод, який повертає значення типуObject. Відповідно, поле отримання це значення потрібно перетворити до потрібного типу.getString(): повертає об'єкт типуString.getInt(): повертає значення типуint.getByte(): повертає значення типуbyte.getChar(): повертає значення типуchar.getShort(): повертає значення типуshort.getLong(): повертає значення типуlong.getFloat(): повертає значення типуfloat.getDouble(): повертає значення типуdouble.getBoolean(): повертає значення типуboolean.getCharArray(): повертає масив об'єктів типуchar.getIntArray(): повертає масив об'єктів типуint.getFloatArray(): повертає масив об'єктів типуfloat.getSerializable(): повертає об'єкт інтерфейсуSerializable.getParcelable(): повертає об'єкт типуParcelable.
Для прикладу розглянемо збереження-отримання складніших даних. Наприклад, об'єктів певного класу. Нехай у нас є клас User:
package com.example.settingsapp;

import java.io.Serializable;

public class User implements Serializable {

    private String name;
    private int age;

    public User(String name, int age){
        this.name = name;
        this.age = age;
    }

    public String getName() {
        return name;
    }

    public void setName(String name) {
        this.name = name;
    }

    public int getAge() {
        return age;
    }

    public void setAge(int age) {
        this.age = age;
    }
}
Клас User реалізує інтерфейс Serializable, тому ми можемо зберегти його об'єкти за допомогою методу putSerializable(), а отримати за допомогою методу getSerializable().
Нехай у нас буде наступний інтерфейс в activity_main.xml:
<?xml version="1.0" encoding="utf-8"?>
<androidx.constraintlayout.widget.ConstraintLayout
    xmlns:android="http://schemas.android.com/apk/res/android"
    xmlns:app="http://schemas.android.com/apk/res-auto"
    android:layout_width="match_parent"
    android:layout_height="match_parent" >

    <EditText
        android:id="@+id/nameBox"
        android:layout_width="0dp"
        android:layout_height="wrap_content"
        android:hint="Введіть ім'я"
        app:layout_constraintBottom_toTopOf="@id/yearBox"
        app:layout_constraintLeft_toLeftOf="parent"
        app:layout_constraintRight_toRightOf="parent"
        app:layout_constraintTop_toTopOf="parent" />
    <EditText
        android:id="@+id/yearBox"
        android:layout_width="0dp"
        android:layout_height="wrap_content"
        android:hint="Введіть вік"
        android:inputType="numberDecimal"
        app:layout_constraintBottom_toTopOf="@id/saveButton"
        app:layout_constraintLeft_toLeftOf="parent"
        app:layout_constraintRight_toRightOf="parent"
        app:layout_constraintTop_toTopOf="parent" />
    <Button
        android:id="@+id/saveButton"
        android:layout_width="wrap_content"
        android:layout_height="wrap_content"
        android:text="Зберегти"
        android:onClick="saveData"
        app:layout_constraintBottom_toTopOf="@id/dataView"
        app:layout_constraintLeft_toLeftOf="parent"
        app:layout_constraintTop_toBottomOf="@id/yearBox"/>

    <TextView
        android:id="@+id/dataView"
        android:layout_width="wrap_content"
        android:layout_height="wrap_content"
        android:textSize="18sp"
        app:layout_constraintBottom_toTopOf="@id/getButton"
        app:layout_constraintLeft_toLeftOf="parent"
        app:layout_constraintTop_toBottomOf="@id/saveButton"/>
    <Button
        android:id="@+id/getButton"
        android:layout_width="wrap_content"
        android:layout_height="wrap_content"
        android:text="Отримати дані"
        android:onClick="getData"
        app:layout_constraintLeft_toLeftOf="parent"
        app:layout_constraintTop_toBottomOf="@id/dataView"/>

</androidx.constraintlayout.widget.ConstraintLayout>
Тут визначено два поля введення для імені та віку відповідно.
У класі MainActivity пропишемо логіку збереження та отримання даних:
package com.example.settingsapp;
import androidx.appcompat.app.AppCompatActivity;
import android.os.Bundle;
import android.view.View;
import android.widget.EditText;
import android.widget.TextView;
public class MainActivity extends AppCompatActivity {
User user = new User("undefined", 0);
final static String userVariableKey = "USER_VARIABLE";
@Override
protected void onCreate(Bundle savedInstanceState) {
super.onCreate(savedInstanceState);
setContentView(R.layout.activity_main);
}
// збереження стану
@Override
protected void onSaveInstanceState(Bundle outState) {
outState.putSerializable(userVariableKey, user);
super.onSaveInstanceState(outState);
}
// отримання раніше збереженого стану
@Override
protected void onRestoreInstanceState(Bundle savedInstanceState) {
super.onRestoreInstanceState(savedInstanceState);
// получаем объект User в переменную
user = (User)savedInstanceState.getSerializable(userVariableKey);
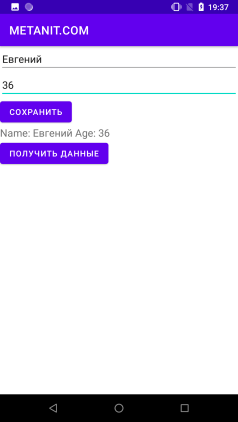
TextView dataView = findViewById(R.id.dataView);
dataView.setText("Name: " + user.getName() + " Age: " + user.getAge());
}
public void saveData(View view) {
// отримуємо введені дані
EditText nameBox = findViewById(R.id.nameBox);
EditText yearBox = findViewById(R.id.yearBox);
String name = nameBox.getText().toString();
int age = 0; // значення за замовчуванням, якщо користувач ввів некоректні дані
try{
age = Integer.parseInt(yearBox.getText().toString());
}
catch (NumberFormatException ex){}
user = new User(name, age);
}
public void getData(View view) {
// отримуємо збережені дані
TextView dataView = findViewById(R.id.dataView);
dataView.setText("Name: " + user.getName() + " Age: " + user.getAge());
}
}
Тут також зберігаємо дані у змінну User, яка попередньо ініціалізована деякими даними за замовчуванням. А під час натискання на кнопку отримання отримаємо дані зі змінної і передаємо їх для виведення в текстове поле.